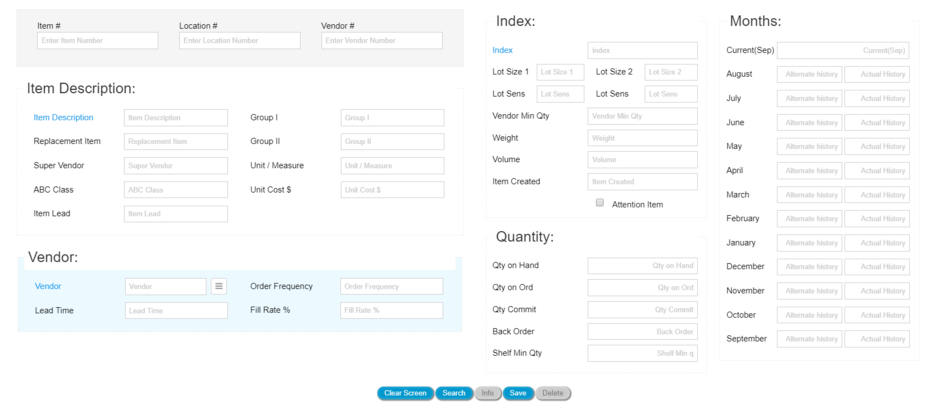
The Item Maintenance page manages data records of individual SKU's or items. To access an existing record, a user may enter an Item #, Location, and optionally a Vendor #.
Item Maintenance Entry
This screen has a variety of uses as follows:
1. View the full detail of an item that has been updated from the host computer, or
2. Change some element of data in an item that has already been updated, or
3. Enter data in a field for an item that was updated, but which you want to maintain via the MARS-IW system, or
4. Create an item "from scratch", or
5. Substitute Item History or create new items with a percent of the existing item's history. To select the item to be used for History Sub, click the "History Sub" button at the top left of the screen and use the "Search" button to select the item. When the item is selected a "History Maint" button will become available at the lower left of the screen. Click the "History Maint" button and an "Entry" window will become available to allow you to enter an item to receive a percent of the history of the item in the Item Master screen. The factor entered will cause the history created for a new item, or changed for an existing item, to become that part of the history of the item in the Item Master screen (i.e., .7 will cause 70%, 1.10 will cause 110%). When the substitution is complete, the item that had its history modified or created will be displayed on the Item Master screen.
When the screen comes up, you can pull in an existing item either by entering the stock number and location directly, or use the search button that will bring up the entire query of items on a separate screen. Click once in the item # field and then double click the item of interest, and it will automatically bring in that item screen. There is also a search feature that allows you to search on a specific field to locate the item or group of items of interest.
Note that this screen looks somewhat different if weekly data is being used vs. monthly data. The full 12 months of monthly history are shown in one screen, but only the last 13 weeks of data are shown for the weekly option. To see the full year's worth of weekly history click on the button marked "history" in the lower left of the screen. The "history" button will take you to the Item History window that will allow you to select This Year or Last Year weekly history.
If you want to create a new item from scratch, click the "New" button and enter the appropriate stock number and location. You then must fill in all the data directly into this screen.
Note, the update will automatically create this information from the host computer under normal circumstances. Therefore, this feature of allowing you to create the item from scratch is not the normal way an item will enter the system.
(Incidentally, you will find throughout the system after entering a number, you have to hit the "tab" key rather than the "enter" key.)
In all cases make sure you click "Save" after you are finished making all the changes for an item so the changes are saved.
If you want to see the implications of your change to the ROT or suggested order, you can click the "Info" button and the "item info" screen will appear that shows the full detail of the item record. You can also see the "Item Detail Info" screen, which is a simulation of the forecasting process. This is accomplished by selecting the "Calculations Detail" button in the lower right section of the screen.
Incidentally, it is possible to use this screen to change a prior month of data to eliminate an order not representative of true demand from inventory or set Shelf or Vendor Minimums. Since the download should be written in such a way that a prior month of sales history does not get rewritten, this feature affords a way to have the PC sales history be different than the host computer's history. For example, assume the last month had sales of 348, but 300 of the demand was for a one time only export sale. You could then use this screen to change the month to 48, and it would remain at that level forever. In the meantime the host computer would reflect the true sales for accounting purposes.
SHELF MIN. - is the parameter you set in the update file. This field will read that value whether it was activated or not (in contrast to the items above). If the final suggested amount is equal to this value, it means that although the system needed less product, it is ordering enough to bring your shelf amount up to this figure. (Shelf minimum is your determination that in order to look like you are "in the business" you need this much product on the shelf, regardless of the demand level.)
VENDOR MIN. - is again, the figure that you set into the update file. It is the minimum order that the vendor will accept for that particular item.
You will note a button called "History Substitution Mode" on the item screen. This is discussed later under a separate section since it is a special feature. (If you click on this green phrase, the full discussion or "History Substitution Mode" will come up.)
Entering large blocks of data thru item maintenance
After you have a specific item up on the screen (as a result of a search) a symbol (<< >>) will appear in the upper right of the screen. The << takes you back one SKU, and the >> moves you forward to the "next" SKU. This is a very handy feature if you intend to maintain some key variables in the P.C. rather than in the host computer. In this way you can simply step from one item to the next without having to search the item each time.
Item Comments
There is a typical need in distribution to have comments attached to a specific item that advises the purchasing manager to take certain action regarding this SKU. MARS-IW accommodates this need very effectively as follows. We will first discuss the insertion of comments, and then the process whereby the user can retrieve the comments during the ordering process.
Insertion of Comments
Comments can be inserted into an SKU by downloading comments that already reside in the host computer or they can be inserted at the PC level, directly via the MARS system.
The download procedure is part of Appendix A, an extract of which is attached, which deals with all download aspects of the system. A key point however, is that disc space will be used for only the actual comments that exist and for only the size of the comment.
To insert a comment via MARS and the PC, call up the item on the “Item Master Screen”. Click on the “Item Description” bar in the upper left of the screen and a window will pop up that prompts you to enter your comment. The screen comment can be up to 254 characters and it is typed as if you were working with a word processor. Click on “Save”, then “Done”, and exit, and you are all set.
To delete a comment from a prior insertion, simply bring up the item and its comment and delete the text, then save.
Retrieval of Comments
Comments can be retrieved or accessed during the ordering process by simply clicking on the button in the lower right of the screen that is marked “I/C”. At this point all the items that do not have comments will disappear and only the items containing comments will remain. If you then want to see the comment associated with any one item, simply click on the description of the item and a box will appear to the right of the description field. Click on this box and the comment window will appear.
If you want to delete the comment permanently while in the ordering process, delete the text and click on “Save”.
Note incidentally, that to maximize the effectiveness of the system, the user must be rigorous about having only comments in the system that are truly pertinent. (E.g., a comment should be purged from the system once it is no longer valid. If this discipline is maintained, then the exception approach of having only comment items displayed after the retrieval button is hit will make sense.)
Radical Button--see Radical seasonality
Detail Information
"Info" - One of the buttons at the bottom of the Order screen is the "Info" button which is used to see additional information about an item of interest. To activate this feature, click on the item in question, and then click the "Info" button. (A faster and simpler method is to click with the alternate mouse clicker after the first selection click and then the item will come up automatically.)
This key screen explores items of interest--where you need to know more about the history, or how the system came to its conclusions.
The lower left area of the screen displays the information that is maintained by MARS for this Item and in turn is used to generate the ROT (reorder target) and MARS reports and are explained in detail in Charlies book. However, in general terms they are the following.
DSAis the period average with all seasonal trends removed.
MADis a statement of how reliably the DSA will retain the same value form period to period.
MSP/WSP is the period supply for the current NET AVAILABLE less on order.
FCSTis the forecast for the next period.
SSis the safety stock component of the ROT.
BCis the basic coverage component of the ROT.
The center of the screen shows the exact sequence the system used in building the order. The ROT, or reorder target, is the amount the system says it needs to have either on-hand or in the pipeline to achieve the fill rate called for. The SUG QTY, or suggested quantity, is simply the difference between the net available and the ROT. If nothing intervened, this is the amount that would be ordered.
EOQ, or economic order quantity, is the amount the order was inflated by if it made good economic sense to order more product to avoid handling costs (a zero simply means that EOQ was not invoked because it was not sensible). Note that the final figure will be capped at the number of months supply as specified in the "System Parameter Screen - Parameter/Filter tab" (e.g., even though theoretically you should order 1238 units, this represents an 18 month supply, which raises issues of obsolescence and deterioration). If the cap is set at the default of 9 months supply, the order is arbitrarily cut to 619.
Lot Sizing indicates that the system invoked the Lot Sizing (or palletizing) feature.
SHELF MIN. - is the parameter you set in the update file. This field will read that value whether it was activated or not (in contrast to the items above). If the final suggested amount is equal to this value, it means that although the system needed less product, it is ordering enough to bring your shelf amount up to this figure. (Shelf minimum is your determination that in order to look like you are "in the business" you need this much product on the shelf, regardless of the demand level.)
VENDOR MIN. - is again, the figure that you set into the update file. It is the minimum order that the vendor will accept for that particular item.
ACT SUG - With the above sequence you can trace the actual process the system went through to arrive at the actual suggested.
History - The first, of the four columns on the right side of the screen, is the most recent year of history. As additional history is generated it will even start to show in the two columns to the furthest right. These columns are headed History LY (last year) and History PY (prior year).
Forecast - The column directly to the right of last year's history, is a 12 month forecast which provides a planning horizon. Note, however, that this forecast is nothing more than the latest deseasonalized exponential average, multiplied times the seasonality index for that month. This may seem odd, but is actually quite sound. At any point, our best estimate of the future is the exponential average of the past (excluding seasonality). As time goes forward, and more history is obtained, the figure will change, but that does not change the fact that at this point all that we know is our most recent events.
Bar Graphing History and Forecast - Directly below each of the four columns discussed above, is a button, if clicked, will show a vivid bar graph of the data. This is particularly interesting if you are trying to check or verify the seasonality of the item. For example, if you hit the button for the prior history, and then do it again for the forecast (which is really only an expression of the seasonality indices that you have in the system), then the comparison gives you an idea if this item is conforming to the seasonality indices to which it is assigned. Checking the pattern of prior years, if they are available, is also handy.